
Ball Kosher Dill Pickle Mix simplifies the pickling process with a pre-blended spice mix, ensuring crispy and flavorful results. Perfect for homemade pickles, it combines traditional dill flavor with ease of use.
Overview of the Ball Kosher Dill Pickle Mix
The Ball Kosher Dill Pickle Mix is a convenient, pre-measured blend of spices and herbs designed to simplify the pickling process. It includes essential ingredients like salt, dehydrated garlic, calcium chloride (for crispness), dextrose, maltodextrin, dill seeds, and natural flavors. This mix ensures a classic kosher dill taste with minimal effort. Perfect for beginners and experienced picklers alike, it eliminates the need to measure individual spices, saving time while delivering consistent results. The mix is versatile, allowing for customization with add-ins like garlic or mustard seeds for a personalized touch.
Importance of Following Proper Instructions
Following the instructions for the Ball Kosher Dill Pickle Mix is crucial for achieving the best results. Proper preparation ensures food safety, prevents spoilage, and guarantees the pickles’ signature crunch and flavor. Deviating from the guidelines can lead to issues like overly salty or soft pickles. The mix is designed to simplify the process, but precise measurements and steps are essential for consistency. By adhering to the instructions, you ensure a reliable and delicious outcome every time, making your pickling experience both enjoyable and successful. This attention to detail is key to crafting high-quality, homemade pickles.

Essential Ingredients for Ball Kosher Dill Pickles
The Ball Kosher Dill Pickle Mix is the cornerstone, combined with water, vinegar, and salt for the brine. Optional add-ins like garlic or fresh dill enhance flavor.
Ball Kosher Dill Pickle Mix
The Ball Kosher Dill Pickle Mix is a pre-blended spice mix designed to simplify homemade pickling. It contains salt, dehydrated garlic, calcium chloride for crispness, dill seeds, and other spices. This mix ensures a traditional kosher dill flavor with minimal effort. Simply combine it with water and vinegar to create the brine. The mix also includes Ball Pickle Crisp Granules, which enhance texture and prevent sogginess. It’s a convenient solution for achieving authentic, crunchy pickles without measuring individual spices. Perfect for both beginners and experienced canners, it streamlines the pickling process while delivering consistent results.
Water and Vinegar Proportions
For the Ball Kosher Dill Pickle Mix, combining water and vinegar in the right proportions is essential for achieving the perfect brine. Typically, 2 cups of water and 2 cups of white vinegar (with 5% acidity) are recommended. This ratio ensures a balanced flavor and proper acidity for safe canning. Always follow the package instructions for precise measurements, as deviations can affect taste and preservation. Adjust proportions as needed for larger batches, maintaining the 1:1 water-to-vinegar ratio for consistency. This blend creates a tangy, flavorful brine that complements the spices in the mix.
Optional Add-ins for Customization
Personalize your pickles by adding optional ingredients to the brine for extra flavor. Common additions include garlic cloves, fresh or dried dill weed, mustard seeds, or red pepper flakes for a spicy kick. These ingredients can be added directly to the jars before pouring in the brine. For a traditional twist, include fresh dill sprigs or dill seeds to enhance the classic kosher dill flavor. Experiment with these additions to create a taste that suits your preferences. These optional add-ins allow you to tailor the pickles without complicating the simple process of using the Ball Kosher Dill Pickle Mix.
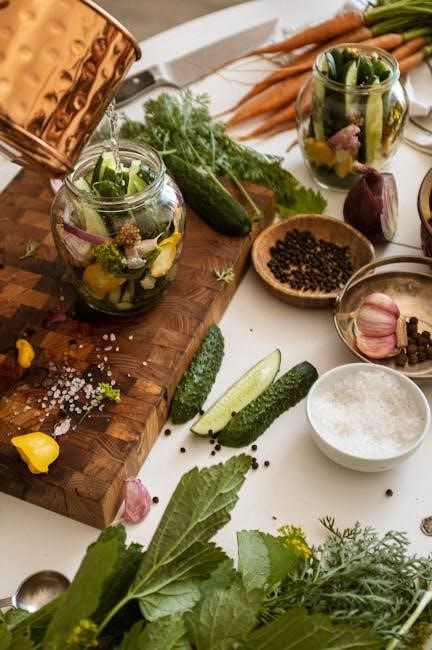
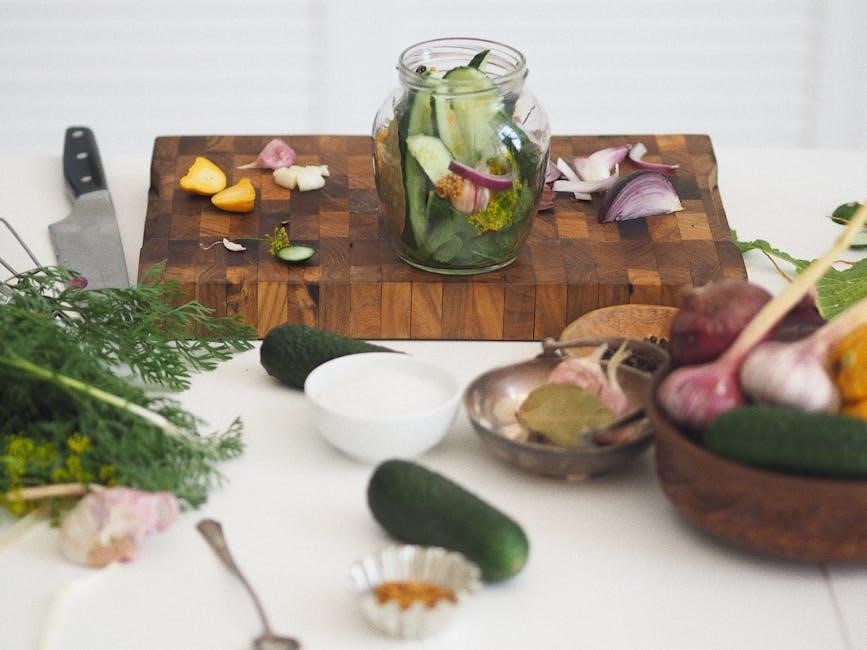
Preparing the Cucumbers
Start by trimming the ends of fresh cucumbers and cutting them into desired shapes, such as spears or slices. Salting or soaking can enhance flavor and texture.
Choosing the Right Cucumbers
For the best results, use fresh, medium-sized pickling cucumbers. They should be firm and free of blemishes. Slicing or Kirby cucumbers are ideal for pickling. Avoid overly large cucumbers, as they may not yield the best texture. Freshness is crucial, so aim to use cucumbers within a day or two of purchase. Before cutting, trim both ends to ensure even brine penetration and improved crispness. Proper selection ensures your pickles will be crunchy and flavorful, making the effort worthwhile.
Trimming and Cutting Cucumbers
Trim both ends of the cucumbers to remove blossom ends, which can cause soft pickles. Cut them into spears, slices, or leave them whole, depending on your preference. For uniform pickling, ensure all pieces are similar in size. Slice cucumbers thinly for quick pickling or into thicker spears for longer storage. Cutting evenly helps the brine penetrate consistently. Avoid using cucumbers with blemishes or soft spots, as they may not pickle well. Proper trimming and cutting are essential for achieving crunchy, flavorful pickles with the Ball Kosher Dill Pickle Mix. This step ensures the best texture and taste.
Salting and Soaking Cucumbers
Salting and soaking cucumbers are crucial steps before pickling. Slice or spear cucumbers and soak them in a saltwater brine for 30 minutes to an hour. This process removes excess water, ensuring crunchier pickles. After soaking, rinse the cucumbers thoroughly to remove excess salt. This step also helps prepare the cucumbers to absorb the flavors of the Ball Kosher Dill Pickle Mix. Proper salting and soaking are essential for achieving the perfect texture and flavor in your homemade pickles. This traditional method enhances the pickling process and ensures a delicious result.

Preparing the Brine
Combine water, vinegar, and Ball Kosher Dill Pickle Mix in a saucepan, following the packet instructions for precise proportions. Heat the mixture to a boil, stirring until the mix dissolves completely. This brine is essential for creating the perfect balance of flavor and crispness in your pickles. Proper preparation ensures the spices and seasonings infuse evenly, resulting in delicious homemade pickles.
Mixing the Ball Pickle Mix with Water and Vinegar
To create the brine, combine water, vinegar, and the Ball Kosher Dill Pickle Mix in a medium saucepan. Follow the instructions on the packet for the exact proportions, typically mixing 2 cups of water with 2 cups of vinegar. Stir the mixture thoroughly to ensure the pickle mix dissolves completely. Heating the brine to a boil is essential for activating the spices and achieving the perfect balance of flavor. The vinegar adds acidity, while the mix contributes salt, dill, and crispness. Proper mixing ensures even distribution of flavors, resulting in crunchy, tangy pickles with a classic dill taste.
Heating the Brine to the Right Temperature
Once the brine ingredients are combined, place the saucepan over medium heat and bring the mixture to a boil. Stir occasionally to dissolve the Ball Kosher Dill Pickle Mix evenly. Allowing the brine to reach boiling ensures that the flavors meld together and the spices activate properly. Once boiling, reduce the heat to a simmer and let it cook for a few minutes to enhance the flavor profile. This step is critical for creating a balanced, tangy brine that will infuse the pickles with the perfect blend of dill, salt, and crispness. Proper heating ensures a consistent texture and taste.
Adding Optional Spices and Herbs
For extra flavor, consider adding optional spices and herbs to the brine before heating. Garlic cloves, dill seeds, or fresh dill weed are popular choices that enhance the classic dill taste. You can also add mustard seeds, coriander seeds, or red pepper flakes for a spicy kick. These additions should be placed in the jars before packing the cucumbers or mixed into the brine during preparation. Experimenting with these ingredients allows you to customize the pickles to your taste preferences while maintaining the foundational flavor of the Ball Kosher Dill Pickle Mix. This step is optional but adds a personal touch.

Packing the Pickles
Properly pack cucumber spears or slices into clean, hot jars, leaving about 1/2 inch of headspace. Ensure pickles are tightly packed and fully covered by the brine.
Packing Cucumber Spears or Slices
To ensure even distribution and proper preservation, pack cucumber spears or slices tightly into clean, hot jars. Fill jars to within 1/2 inch of the top. This prevents spoilage and ensures all pickles are covered by the brine. For best results, pack while the brine is still hot. Use a clean utensil to remove any air bubbles, ensuring pickles are fully submerged. Proper packing methods help maintain crispness and flavor in your homemade pickles. Always follow safe canning practices for optimal results.
Leaving Proper Headspace
Leaving the correct headspace in your jars is crucial for successful canning. For pickles, leave about 1/2 inch of space between the brine and the jar lid. This allows for expansion during heating and ensures a proper seal. Too little headspace can cause jars to leak or fail to seal, while too much may leave pickles exposed. Use a clean tool to remove air bubbles before adjusting the headspace. Proper headspace ensures your pickles are safely preserved and ready for storage. Always follow the recommended guidelines for best results.
Ensuring Pickles are Covered with Brine
To ensure pickles are fully covered with brine, pack them tightly in jars and pour the hot brine over them, leaving the recommended headspace. Use a clean utensil to remove any air bubbles, as trapped air can cause uneven coverage. Once the brine is added, make sure all pickles are submerged to prevent spoilage and promote even flavor distribution. Proper coverage ensures pickles are crispy and tangy, with consistent taste throughout. Always follow the Ball Kosher Dill Pickle Mix instructions for precise measurements and ratios of water and vinegar. This step is vital for both flavor and preservation.
Sealing the Jars
Place lids and bands on jars, tightening them finger-tight to ensure a proper seal. This step is crucial for preserving pickles and maintaining freshness during storage.
Using Ball Quart Jars and Lids
Ball Quart jars and lids are essential for safely preserving your pickles. Ensure jars are clean and sterilized before use. Place the two-piece lids and bands on the jars, following the manufacturer’s guidelines for proper fit. This ensures a tight seal and prevents contamination. Ball Quart jars are designed specifically for canning, with a 32 oz capacity perfect for holding pickles. Always follow the instructions provided with the jars to guarantee successful preservation. Properly prepared jars will store pickles securely, maintaining freshness and flavor for months.
Tightening Lids Finger-Tight
Tightening lids finger-tight ensures a proper seal without over-tightening, which can prevent the jars from venting air during processing. Place the lid on the jar, then screw the band until it meets resistance. Avoid using excessive force, as this may damage the lid or jar. Finger-tightening allows the necessary pressure for a vacuum seal to form during the boiling water bath. This step is crucial for preventing spoilage and ensuring the pickles remain fresh. Always follow Ball’s guidelines for lid preparation and tightening to achieve optimal results. This ensures jars are sealed correctly for safe storage.
Ensuring Proper Seal for Storage
After processing, let jars cool undisturbed for 12-24 hours to allow seals to set. Check the seal by pressing on the lid; it should not move or show indentation. Store jars in a cool, dark place, ensuring they are not exposed to direct sunlight or moisture. Properly sealed jars will keep pickles fresh for up to 12 months. If a jar does not seal, refrigerate it and consume within 3 months. Always verify the seal before storing to ensure long-term preservation and food safety. This step is vital for maintaining the quality and freshness of your homemade pickles.
Processing the Jars
Place jars in a boiling water bath, ensuring they are fully submerged. Process for 10-15 minutes, adjusting for altitude as needed. After processing, remove jars and let them cool.
Boiling Water Bath Setup
To set up a boiling water bath, fill a large pot with enough water to cover the jars by at least 1 inch. Place a rack at the bottom to prevent jars from cracking. Bring the water to a rolling boil before adding the jars. Ensure the pot is large enough to hold all jars without overcrowding. Maintain a steady boil throughout the processing time. For high altitudes, extend the boiling time as needed to ensure proper sterilization and sealing. This step is critical for achieving a vacuum seal and ensuring the pickles are safely preserved. Always follow safe canning practices.
Processing Time and Altitude Adjustments
Processing time in a boiling water bath typically ranges from 10 to 15 minutes for quart jars, depending on altitude. At sea level, process for 10 minutes. For every 1,000 feet above sea level, add 1 minute to the processing time. Altitude adjustments ensure the pickles are properly sterilized and sealed. Always consult a reliable canning guide for specific altitude recommendations. Accurate processing time is crucial for food safety and maintaining the quality of your homemade pickles. Adjustments help prevent under-processing, which can lead to spoilage. Follow guidelines carefully to achieve perfectly preserved pickles every time.
Removing Jars and Cooling Them
After processing, carefully remove jars from the boiling water bath using a jar lifter. Place them on a wire rack or clean towel, ensuring they are not touching. Allow the jars to rest undisturbed for 12-24 hours to cool completely and form a vacuum seal. Do not tighten lids during cooling, as this could prevent proper sealing. Once cooled, check seals by pressing on the lid; a concave lid indicates a good seal. Store jars in a cool, dark place for optimal flavor development. Proper cooling and sealing are critical for long-term preservation and safety.

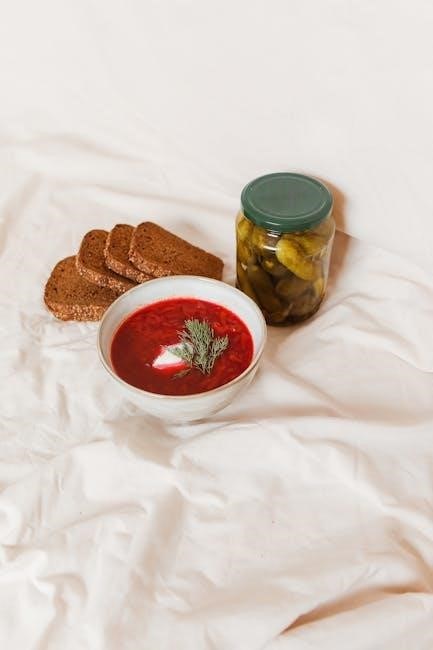
Storing the Pickles
After cooling, store sealed jars in a cool, dark place. Pickles will develop flavor over time and can be kept for up to 12 months.
Cooling Jars Before Storage
After processing, allow the jars to cool on a wire rack, undisturbed, for 12-24 hours. This ensures the seals set properly and prevents spoilage. Do not tighten lids during cooling, as this can interfere with the sealing process. Keep jars away from drafts to maintain even cooling. Once cooled, check the seals by pressing on the lid; if it does not move, the jar is sealed correctly. Store sealed jars in a cool, dark place or refrigerate for fresh pickles. Proper cooling is essential for long-term storage and food safety.
Refrigeration for Fresh Pickles
For immediate consumption, store pickles in the refrigerator after cooling. Place jars in the fridge within 24 hours of processing to maintain freshness. Refrigeration slows fermentation, preserving crispness and flavor. Properly sealed jars can last several months in the fridge. Always check for any signs of spoilage before consuming, such as off odors or mold. Serve pickles straight from the fridge for the best taste and texture. This method ensures your homemade pickles remain fresh and ready to enjoy.
Shelf Life and Storage Conditions
Properly sealed jars of pickles can be stored in a cool, dark place for up to 5 years. Ensure jars are undamaged and free from contamination. Store at room temperature, away from direct sunlight. Once opened, refrigerate immediately to maintain freshness. Always check jars for any signs of spoilage, such as swelling or mold, before consumption. Follow safe canning practices to ensure long-term storage without refrigeration. Proper storage conditions are crucial for preserving the quality and safety of your homemade pickles.

Customization Tips
Personalize your pickles by adding garlic, fresh dill, or spices to the brine. Adjust the seasoning levels to suit your taste preferences for unique flavor profiles.
Adding Garlic for Extra Flavor
For an extra burst of flavor, add garlic to your pickling brine. Peel and mince 2-4 garlic cloves per jar, depending on your preference. Add them directly to the jars before packing the cucumbers. The garlic infuses into the brine during processing, creating a robust and aromatic flavor profile. This step enhances the traditional dill taste while adding a savory twist. Ensure the garlic is evenly distributed to maximize flavor infusion. This simple customization elevates your homemade pickles to a new level of deliciousness.
Incorporating Dill Seeds or Fresh Dill
Enhance your pickles with authentic dill flavor by adding dill seeds or fresh dill weed. For a classic taste, include 1 teaspoon of dill seeds per jar or add a few sprigs of fresh dill. Dill seeds provide a robust, slightly bitter flavor, while fresh dill offers a brighter, more aromatic taste. Both options complement the Ball Kosher Dill Pickle Mix perfectly, creating a traditional pickling profile. Add the dill directly to the jars before packing the cucumbers for optimal flavor infusion during processing. This step ensures a genuine dill pickle experience with every bite.
Adjusting Spice Levels to Taste
Tailor your pickles’ flavor by adjusting the spice levels in the Ball Kosher Dill Pickle Mix. For extra zing, add a pinch of red pepper flakes or a clove of minced garlic to the brine. If you prefer a milder taste, reduce the mix’s spice content slightly. Experiment with optional add-ins like mustard seeds or coriander for unique flavor profiles. Remember, the mix is a foundation, so feel free to tweak it to suit your palate. Adjusting spices ensures your pickles are perfectly seasoned to your liking, whether bold or subtle. This step allows for personalization, making each batch truly yours.
Troubleshooting Common Issues
Common issues like soft pickles or cloudy brine can arise. Ensure proper salt proportions, adequate soaking time, and correct brine temperature to maintain crispness and clarity.
Ensuring Pickle Crispness
To achieve crunchy pickles, use the Ball Pickle Crisp Granules included in the mix, which contain calcium chloride. Soak cucumbers in saltwater before pickling to remove excess moisture. Ensure the brine reaches a full boil and pour it hot over the pickles. Avoid over-processing jars in the water bath, as this softens pickles. Store jars in the refrigerator after cooling, allowing pickles to chill for at least 24 hours before serving. Proper techniques and ingredients guarantee a satisfying crunch in every bite.
Fixing Brine Proportions
If the brine tastes too salty, dilute it with a small amount of water or vinegar. For a sweeter brine, add a touch of sugar. Always follow the Ball Kosher Dill Pickle Mix instructions for the correct water-to-vinegar ratio. If the brine is too weak, mix in a little more pickle mix. Avoid overcorrection, as this can disrupt the pickling process. For best results, measure ingredients accurately before mixing. Adjustments should be minimal to maintain proper acidity and flavor balance. This ensures pickles are tangy, crunchy, and safely preserved.
Addressing Sealing Issues
If jars fail to seal properly, check for any debris on the rim or lid. Ensure lids are clean and not dented. Use a clean, damp cloth to wipe rims before applying lids. If a jar doesn’t seal after processing, refrigerate it immediately to enjoy fresh pickles. For persistent sealing issues, reprocess the jar in a boiling water bath for an additional 5-10 minutes. Always use Ball jars and lids for reliable results. Proper sealing is crucial for long-term storage and food safety.
Using the Ball Kosher Dill Pickle Mix ensures a delicious and crunchy homemade pickle experience. Follow the instructions carefully for perfect results and enjoy your fresh, flavorful pickles!
Final Tips for Perfect Pickles
To achieve the best results with your Ball Kosher Dill Pickle Mix, ensure all utensils and jars are sterilized. Pack cucumbers tightly and leave adequate headspace. Use fresh dill or garlic for extra flavor. Always process jars in a boiling water bath to ensure safety and longevity. Store sealed jars in a cool, dark place and allow pickles to mature for a few days before eating. Experiment with spices to tailor the flavor to your taste, and enjoy the crunchy, tangy goodness of homemade pickles!
Enjoying Your Homemade Pickles
Once your pickles are ready, store them in the refrigerator to maintain freshness. For the best flavor, let them chill for at least 24 hours before serving. Enjoy them as a crunchy snack, add them to sandwiches, or use them as a tangy side dish. Share your homemade pickles with family and friends, knowing you crafted them with care. Experiment with additional flavors like garlic or dill for variety. With the Ball Kosher Dill Pickle Mix, you can create delicious, customizable pickles that elevate any meal or gathering.
Leave a Reply
You must be logged in to post a comment.